

Homemade soup stock is the ultimate foundational element in high-end culinary kitchens and frugal home pantries alike. Far superior to store-bought, salt-laden cartons, a well-crafted stock delivers rich gelatinous body, deep umami complexity, and complete control over ingredients.
Whether you are capturing the deep marrow flavor of roasted beef bones or making a vibrant, waste-zero vegetable broth from kitchen scraps, this complete guide covers the culinary mechanics, flavor development, stovetop and slow-cooker methods, and safe long-term preservation techniques (including USDA-compliant pressure canning).
1. Stock vs. Broth: Understanding the Culinary Mechanics
While often used interchangeably in everyday conversation, culinary science distinguishes between stock, broth, and bone broth based on ingredients, extraction times, and final texture:
- Stock (Fond): Made primarily from bones with minimal leftover meat, simmered slowly with a classic mirepoix and aromatics. The primary goal of stock is to extract collagen from connective tissue, which converts into gelatin, giving chilled stock a rich, jelly-like body. Stocks are typically left unsalted so they can be reduced into sauces or used across various recipes.
- Broth: Made primarily from meat (often with some bones) and vegetables. It yields a lighter, more delicate flavor, cooks in less time, and is usually salted and served as a standalone soup base.
- “Bone Broth”: A modern wellness term for an extended-extraction stock. Bones are simmered for 12 to 24 hours (often with a mild acid like vinegar) to break down tissue and extract maximum collagen, deep minerals, and amino acids (proline and glycine).
- Vegetable “Stock” / Broth: Technically, true stock requires bones for gelatin extraction. However, vegetable broth serves the exact same role in plant-based cooking. Body is achieved by utilizing ingredients rich in natural starches, glutamates (umami), and rich scrap combinations.
2. The Zero-Waste “Something-for-Nothing” Scrap Collection
One of the most cost-effective kitchen practices is stockpiling vegetable trimmings and leftover bones in the freezer. Keep two dedicated gallon freezer bags in your freezer: one labeled Bones and one labeled Vegetable Scraps.
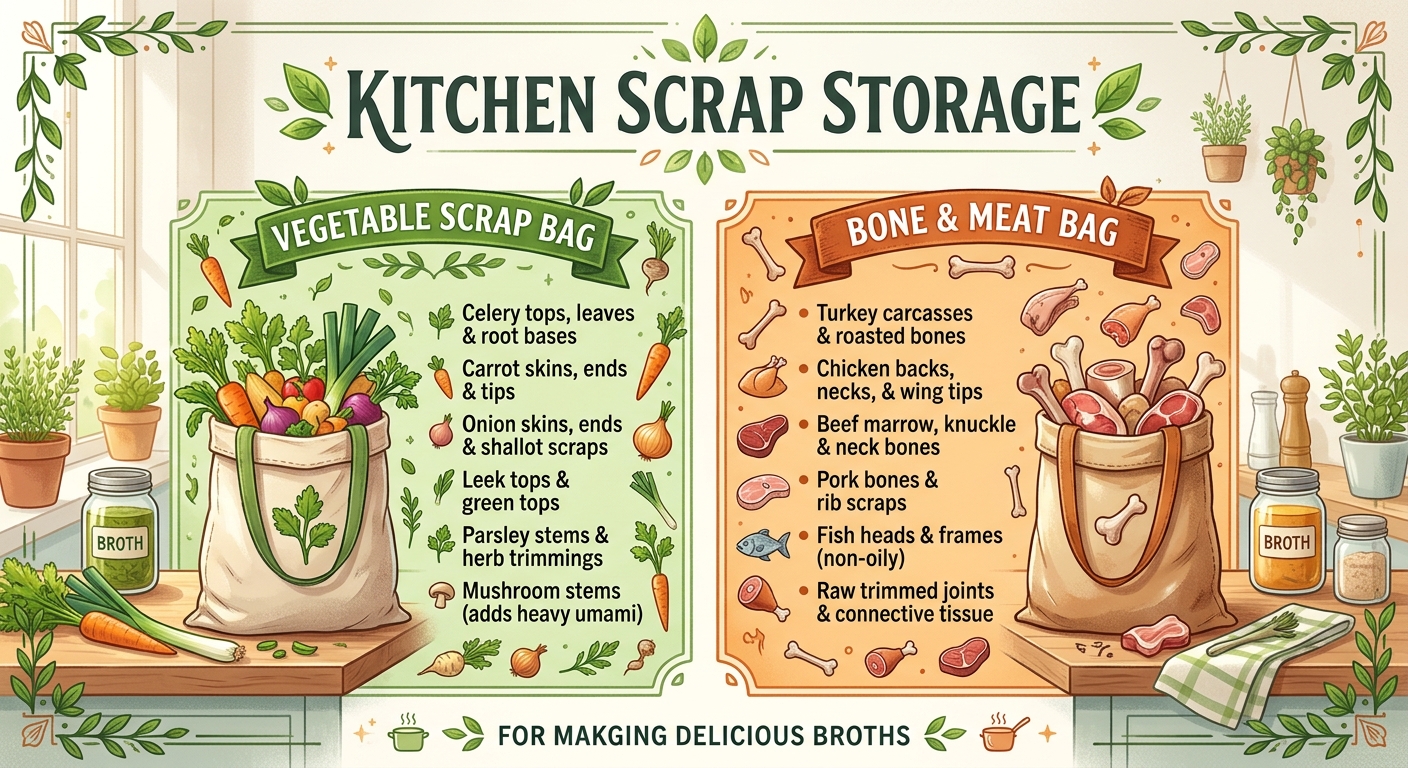
Ingredients to Use with Caution or Avoid Entirely
- Brassicas & Cruciferous Vegetables (AVOID): Broccoli, cabbage, cauliflower, Brussels sprouts, kale, and turnips contain sulfur compounds. When simmered long-term, they turn bitter and impart an overpowering, unpleasant odor.
- Bitters & Starchy Roots (AVOID): Potato peels turn stock cloudy and muddy; turnip/rutabaga peels introduce excessive bitterness.
- Strong Herbs (USE SPARINGLY): Rosemary, sage, cilantro, and mint quickly overpower stock. Stick to classic bay leaves, fresh thyme, and parsley stems.
- Tomatoes & Acidic Scraps (USE INTENTIONALLY): Tomato ends and paste add a rich umami punch and acidity, but they darken the stock and impart a distinct red tint and flavor profile. Label stocks containing tomato clearly.
3. Flavor Science: Mirepoix, Aromatics, and Gelatin ExtractionThe Classic Mirepoix Ratio
The traditional foundation for Western stocks is a Mirepoix—a ratio of 2 parts onion, 1 part carrot, and 1 part celery by weight:
- 2 Parts Onion: Provides natural sugars, sweetness, and aroma. (Leaving clean yellow onion skins on adds a deep golden amber color to the stock).
- 1 Part Carrot: Adds sweetness and earthiness.
- 1 Part Celery: Provides aromatic depth and fresh herbal notes.
Flavor Enhancers & Aromatics (Bouquet Garni)
Tie or bundle the following aromatics into a cheesecloth bag or add directly to the pot:
- Whole Black Peppercorns: Provide subtle heat without darkening the broth.
- Bay Leaves: Contain eugenol and herbal notes that tie vegetable and meat flavors together.
- Fresh Thyme & Parsley Stems: Essential herb foundations.
- Whole Cloves (1 or 2 max): Adds a subtle warm background note (do not over-use).
The Role of Acid in Gelatin Extraction
Adding a small splash (1 to 2 tablespoons) of apple cider vinegar or lemon juice to your water lowers the pH slightly. This gentle acidity aids in breaking down the collagen in cartilage and connective tissues, releasing gelatin and trace minerals into the stock without altering the final taste.
4. Step-by-Step Cooking Methods
Method A: Traditional Stovetop Extraction
-
Roast for Color and Depth (Optional for Brown Stock): For a deep brown beef or chicken stock, roast bones and vegetables at 400°F (200°C) for 30–45 minutes until browned before adding them to the pot. Deglaze the roasting pan with water and pour the pan juices into the pot.
-
Combine & Cover: Place cold bones, frozen or fresh scraps, and aromatics in a large stockpot. Cover with cold water by 1 to 2 inches. (Starting with cold water allows soluble proteins to dissolve slowly without heat-clumping, keeping stock clear).
-
Bring to a Bare Simmer: Heat over medium-high until the first few bubbles surface, then immediately lower heat. Never allow bone stock to boil rapidly. Boiling churns emulsified fats and impurities back into the liquid, producing a cloudy, greasy stock.
-
Skim the Surface (Dépouillage): During the first 30–60 minutes, skim off any foam, scum, or floating impurities that rise to the surface using a fine spoon or ladle.
-
Simmer Timeframe:
- Vegetable Stock: 45 to 60 minutes (longer cooks degrade flavor freshness).
- Fish Stock (Fumet): 30 to 45 minutes.
- Poultry Stock: 4 to 6 hours.
- Beef / Pork Stock: 6 to 8+ hours.
6. Strain and Clarify: Pour the stock through a fine-mesh sieve lined with cheesecloth or a nut milk bag. Do not press down hard on the solids, as this forces fine particulate matter through and clouds the stock.
Method B: Slow-Cooker (Crockpot) Method
-
Add bones, vegetable scraps, aromatics, vinegar, and cold water to your slow cooker liner, leaving at least 1 inch of headroom.
-
Cover and cook on High for 30–60 minutes to bring the liquid up to temperature.
-
Reduce setting to Low and cook:
-
Vegetable Stock: 2 to 4 hours on Low.
-
Bone Stock: 10 to 18 hours on Low.
-
-
Strain and clarify as described above.
5. Rapid Cooling & Fat Management
Food Safety: The Temperature Danger Zone
Stock contains dense nutrients and moisture, making it a high-risk environment for bacterial growth if left sitting between 40°F (4°C) and 140°F (60°C).
- Ice-Bath Cooling: Place your pot or container in a sink filled with ice and cold water. Stir the stock periodically until the temperature drops below 70°F (21°C) within 2 hours, then transfer to the refrigerator to chill down to 40°F (4°C).
- Fat Removal:
- Hot Method: Blot the top gently with clean paper towels or use a fat separator pitcher.
- Cold Method (Recommended): Chill the stock overnight in the refrigerator. The fat will float to the top and solidify into a hard disk (“fat cap”). Simply lift off the solid fat cap with a spoon before packaging.
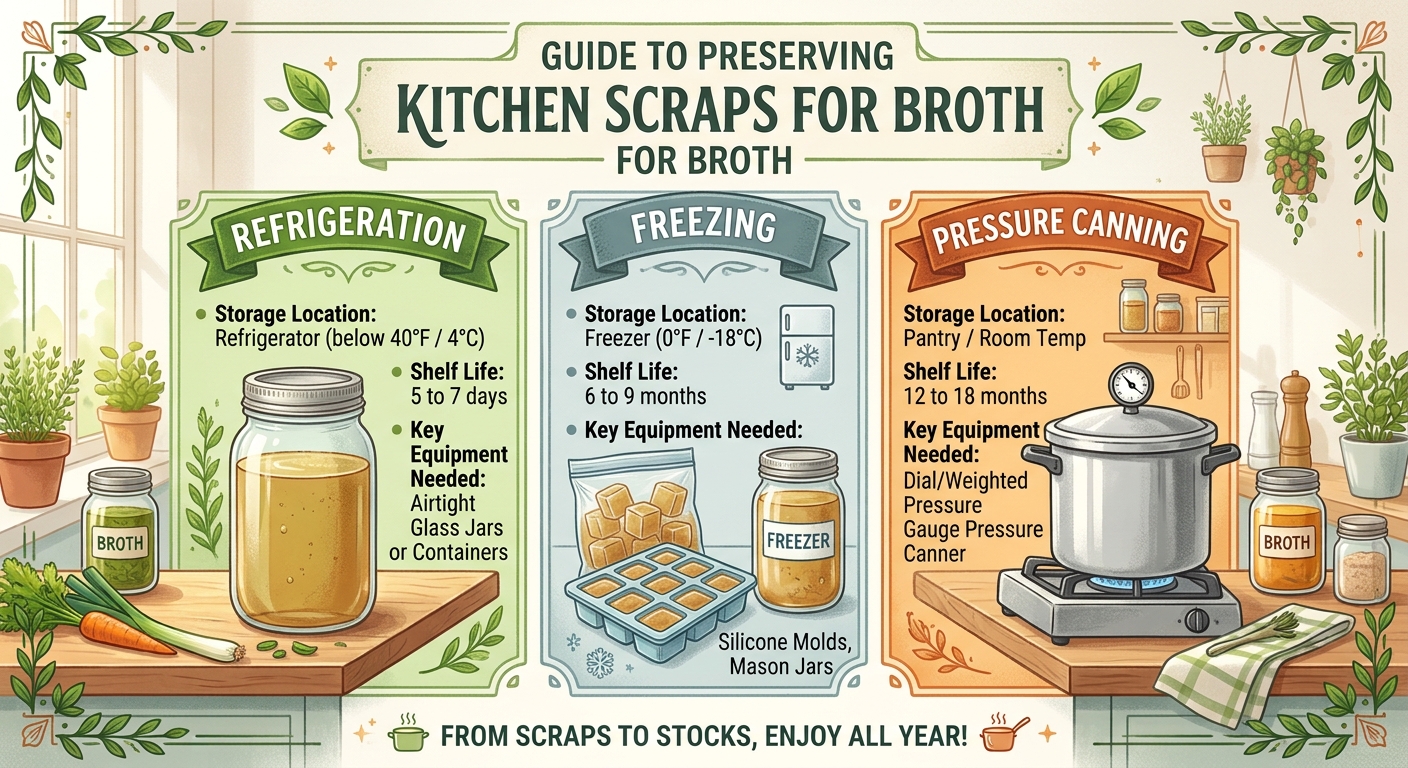
Freezing Techniques
- Flat Bag Method: Pour cooled stock into gallon or quart-sized heavy-duty freezer bags. Squeeze out excess air, seal tightly, and lay flat on a baking sheet to freeze. Once solid, stack the flat bags vertically like books to maximize freezer space.
- Ice Cube / Portion Molds: Freeze stock in silicone soup molds or ice cube trays. Once frozen solid, pop the cubes into a freezer bag for easy single-portion additions to skillet dishes, gravies, and rice.
- Headspace Warning: If freezing in upright glass jars or plastic containers, leave at least 1 to 1.5 inches of empty space at the top. Liquids expand significantly when freezing; failing to leave headspace will shatter glass jars.
Pressure Canning (USDA Safe Process)
⚠️ CRITICAL SAFETY WARNING: Both vegetable stocks and bone stocks are low-acid foods (pH above 4.6). They CANNOT be safely processed in a boiling water bath canning setup. Processing low-acid foods in a water bath does not reach the 240°F (116°C) temperature required to destroy Clostridium botulinum spores, creating a dangerous risk of botulism poisoning. You MUST use a pressure canner.
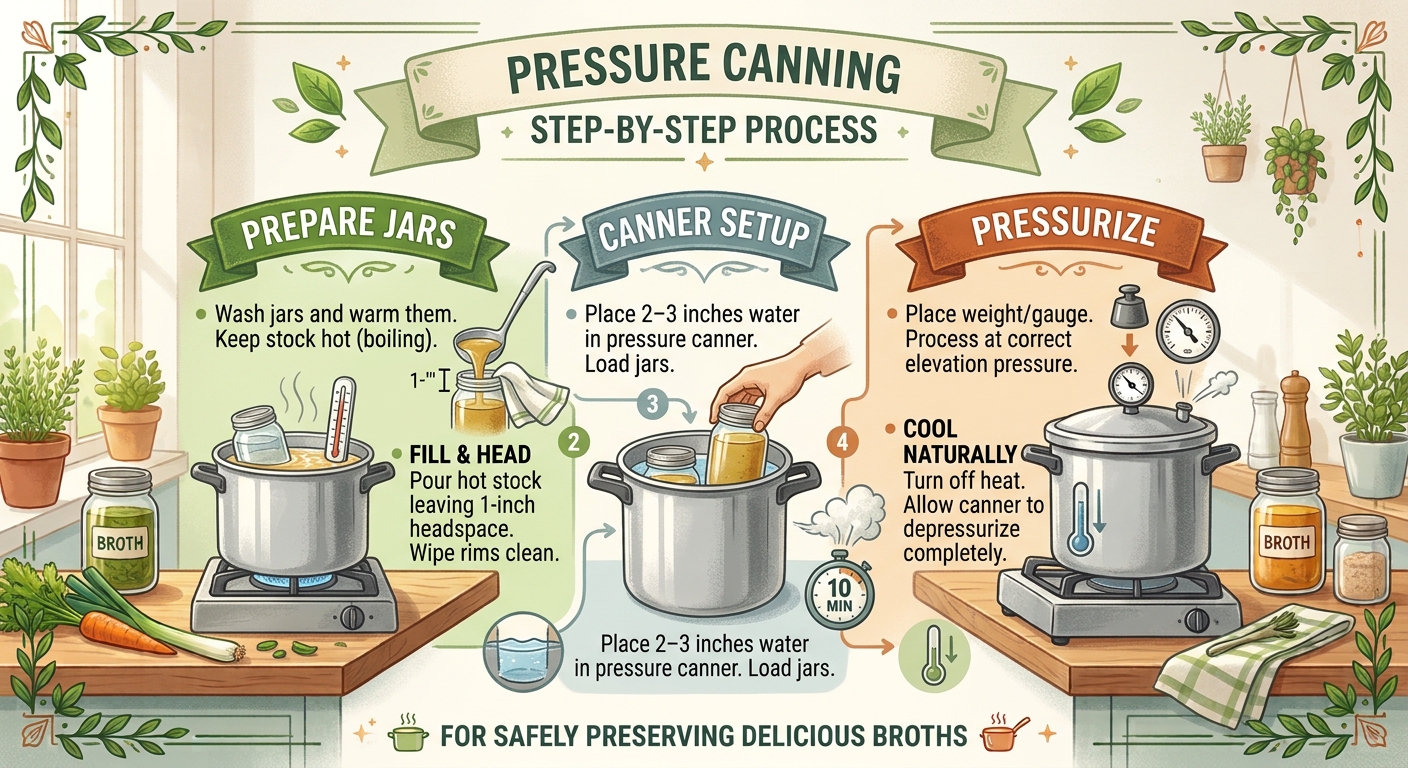
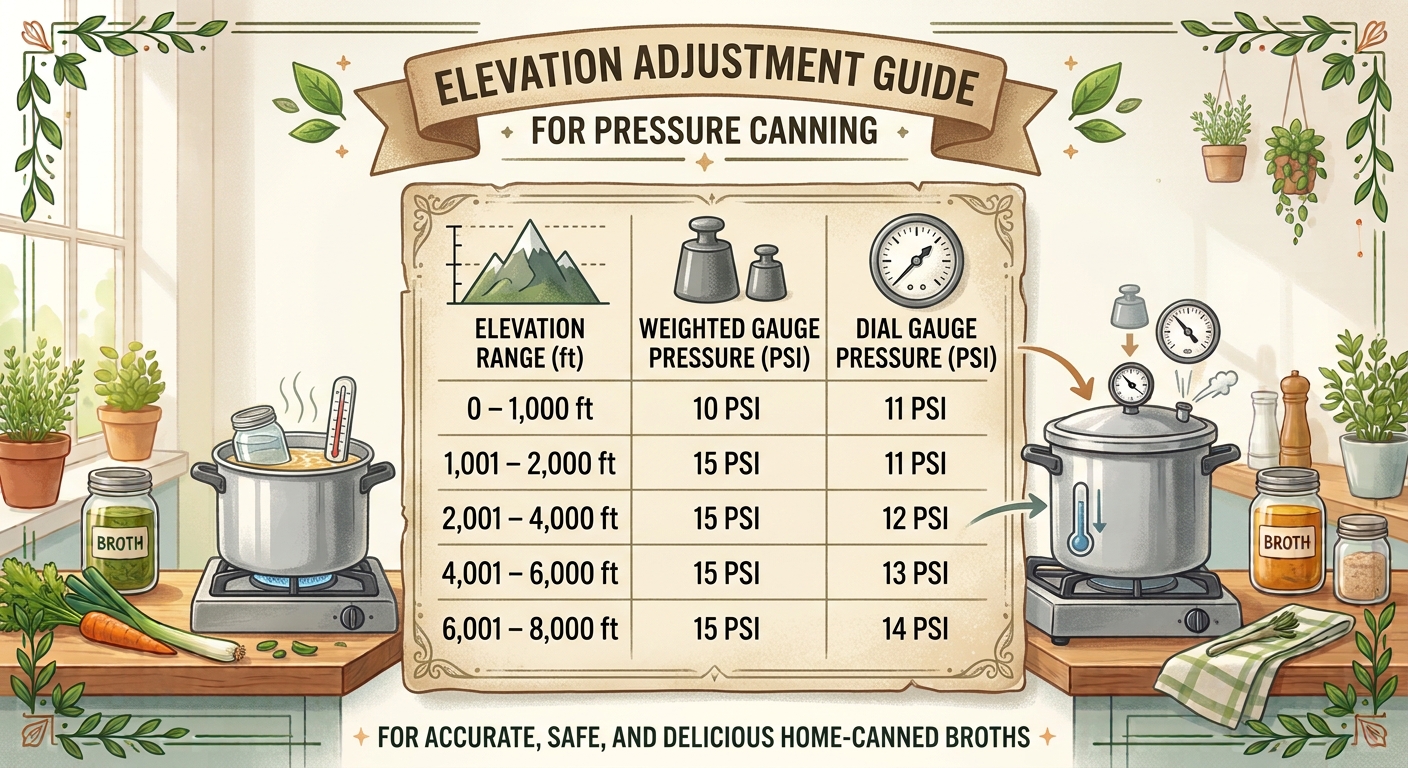
Official Processing Times & Standard Pressures
-
Pints: Process for 20 minutes
-
Quarts: Process for 25 minutes
7. Troubleshooting Common Stock Issues
-
Problem: My stock turned cloudy.
Cause: The stock was allowed to boil vigorously, or was stirred heavily while cooking, emulsifying fat and solids into the liquid.
Fix: Keep future batches at a bare simmer. To clarify a cloudy stock, make an “egg white raft”: whisk 2 egg whites with 1/2 cup cold water and crushed eggshells, stir into lukewarm stock, bring to a gentle simmer, and let the rising egg white protein trap particles before straining out.
-
Problem: My stock didn’t turn to gel/jelly when chilled.
Cause: Too much water was used relative to the amount of bones, or the bones lacked connective tissue (joints, feet, necks, or knuckles).
Fix: Reduce the stock further over medium heat to concentrate gelatin, or add chicken feet/knuckle bones to the next batch.
-
Problem: The stock tastes bland or flat.
Cause: Homemade stock is un-salted by default.
Fix: Add a pinch of salt when cooking your final dish, or reduce the stock down further to concentrate the underlying sugars and umami compounds.


This is an original creative work by Salty Vixen. This story/article, including its characters, plot, and descriptive content, is protected by copyright law. Unauthorized copying, sharing, reposting, or reproduction in any format is strictly prohibited. This content may not be used for AI training, data scraping, machine learning, or any form of artificial intelligence development without explicit written permission from © 2026 Salty Vixen Stories, Inc. — All rights reserved.. Violators will be pursued to the fullest extent of the law.