
Forget everything you know about traditional costume makeup. The era of thick, cakey grease paint, awkward tissue-paper scabs, and flat green face powder is officially dead. Traditional zombie makeup was designed for stage lights and cheap haunted houses, resulting in a heavy, mask-like finish that cracked, peeled uncomfortably, and looked completely flat on camera.
Modern undead beauty takes an entirely different approach. Blending high-fashion editorial techniques with cinematic special effects, today’s zombie aesthetic focuses on snatched bone structure, multi-dimensional bruising, subtle skin texture, and wet-look gory accents. It’s equal parts dark grunge, Siren-core, and post-apocalyptic realism. Whether you’re creating a look for a music festival, a Halloween rave, a short film, or a high-impact social media transformation, this step-by-step guide walks you through crafting a cinematic, long-lasting zombie look using products you likely already own in your makeup kit.
The Shift: Traditional SFX vs. Modern Undead Beauty
To achieve a modern look, it helps to understand what makes older zombie tutorials feel outdated and how to swap those techniques for elevated alternatives.
Full-Face White Grease Paint vs. Modern Skin Tint
Modern Editorial Approach: Pale, desaturated skin tint or full-coverage foundation.
Why It Works Better: Creates a realistic, translucent dead-skin effect rather than a chalky mask.
Liquid Latex & Tissues vs. Glue-Stick Peeling Skin
Modern Editorial Approach: Targeted glue-stick peeling skin or wax detailing.
Why It Works Better: Lightweight, comfortable to wear for hours, and doesn’t lift off in large sheets.
Flat Black Eye Circles vs. Layered Eye Shadows
Modern Editorial Approach: Layered purple, grey, burgundy, and olive eyeshadows.
Why It Works Better: Mimics real subcutaneous vascular pooling and blood settling.
Crusty Dried Blood vs. High-Shine Gloss Blood
Modern Editorial Approach: High-shine blood mixed with clear lip gloss or oil.
Why It Works Better: Retains a wet, fresh, light-reflecting look that pops on camera and under dark party lights.
Heavy Contour Lines vs. Anatomical Shading
Modern Editorial Approach: Cool-toned taupe and grey shading blended into facial anatomy.
Why It Works Better: Sculpting follows natural muscle and bone structure for a truly hollowed-out look.
Kit Essentials: What You Actually Need
You don’t need to buy expensive, professional-grade special effects wheels or costume kits that clog your pores and break you out. High-pigment street cosmetics and everyday drugstore items give you far more control, blendability, and longevity.
1. Base & Prep
-
Hydrating Skin Primer: Preps the skin so full-coverage products sit smoothly without flaking.
-
Pale Foundation or Concealer: Select a shade two to three tones lighter than your natural skin color. Opt for cool or neutral undertones.
-
Color Correctors or Liquid Pigments: A small dot of grey, blue, or muted green liquid mixer neutralizes warmth in your foundation.
-
Translucent Loose Setting Powder: A finely milled matte powder to eliminate shine on selected areas.
2. Color & Dimension
-
A Grungy Matte Eyeshadow Palette: You will need shades of cool charcoal grey, dusty lavender, deep plum/burgundy, olive green, matte brown, and deep black.
-
Cool-Toned Cream Contour or Grey Bronzer: Crucial for carving out hollow bone structure.
-
Fine-Tip Gel Eyeliners: In shades of deep burgundy, oxblood, plum, and subtle muted blue.
3. SFX & Accent Details
-
Washable Glue Stick (Elmer’s style) or Liquid Latex: For subtle, textured skin peeling.
-
Fine-Point Detail Brushes: Nail art brushes or ultra-thin eyeliner brushes for drawing realistic veins.
-
Stippling Sponge or Coarse Kitchen Sponge: Perfect for creating broken capillaries and speckled texture.
-
Fake Blood & Clear Gloss: Gel blood, runny fake blood, and an inexpensive clear lip gloss.
Step 1: Skin Preparation & The Translucent Pale Base
The key to a believable zombie base is making the skin look drained of circulation rather than painted white. Real skin has depth, translucency, and subtle underlying veins.
Prepping the Canvas
-
Cleanse and Hydrate: Cleanse your face thoroughly to remove oil. Apply a lightweight moisturizer followed by a hydrating primer. Avoid overly oily primers, as they will break down your makeup over time.
-
Neutralize Warmth: Take your light foundation or full-coverage concealer on a mixing palette. Add a tiny drop of grey eyeshadow, blue color corrector, or green corrector into the foundation. Mix until the shade looks washed-out, cool, and desaturated.
-
Application: Buff the foundation across your face using a dense foundation brush or a damp beauty sponge.
-
Crucial Detail: Carry the foundation directly over your lips to strip them of natural pink tones.
-
Blend down past the jawline, over the neck, onto the ears, and down over the collarbones. Unpainted neck skin immediately ruins the illusion.
-
-
Targeted Setting: Lock down the face with a heavy dusting of translucent setting powder, focusing on the T-zone, jawline, and neck. Leave the high points of the cheeks unpowdered for now if you plan to add wet-look accents later.
Step 2: Carving the Bone Structure (The “Snatched” Hollow Look)
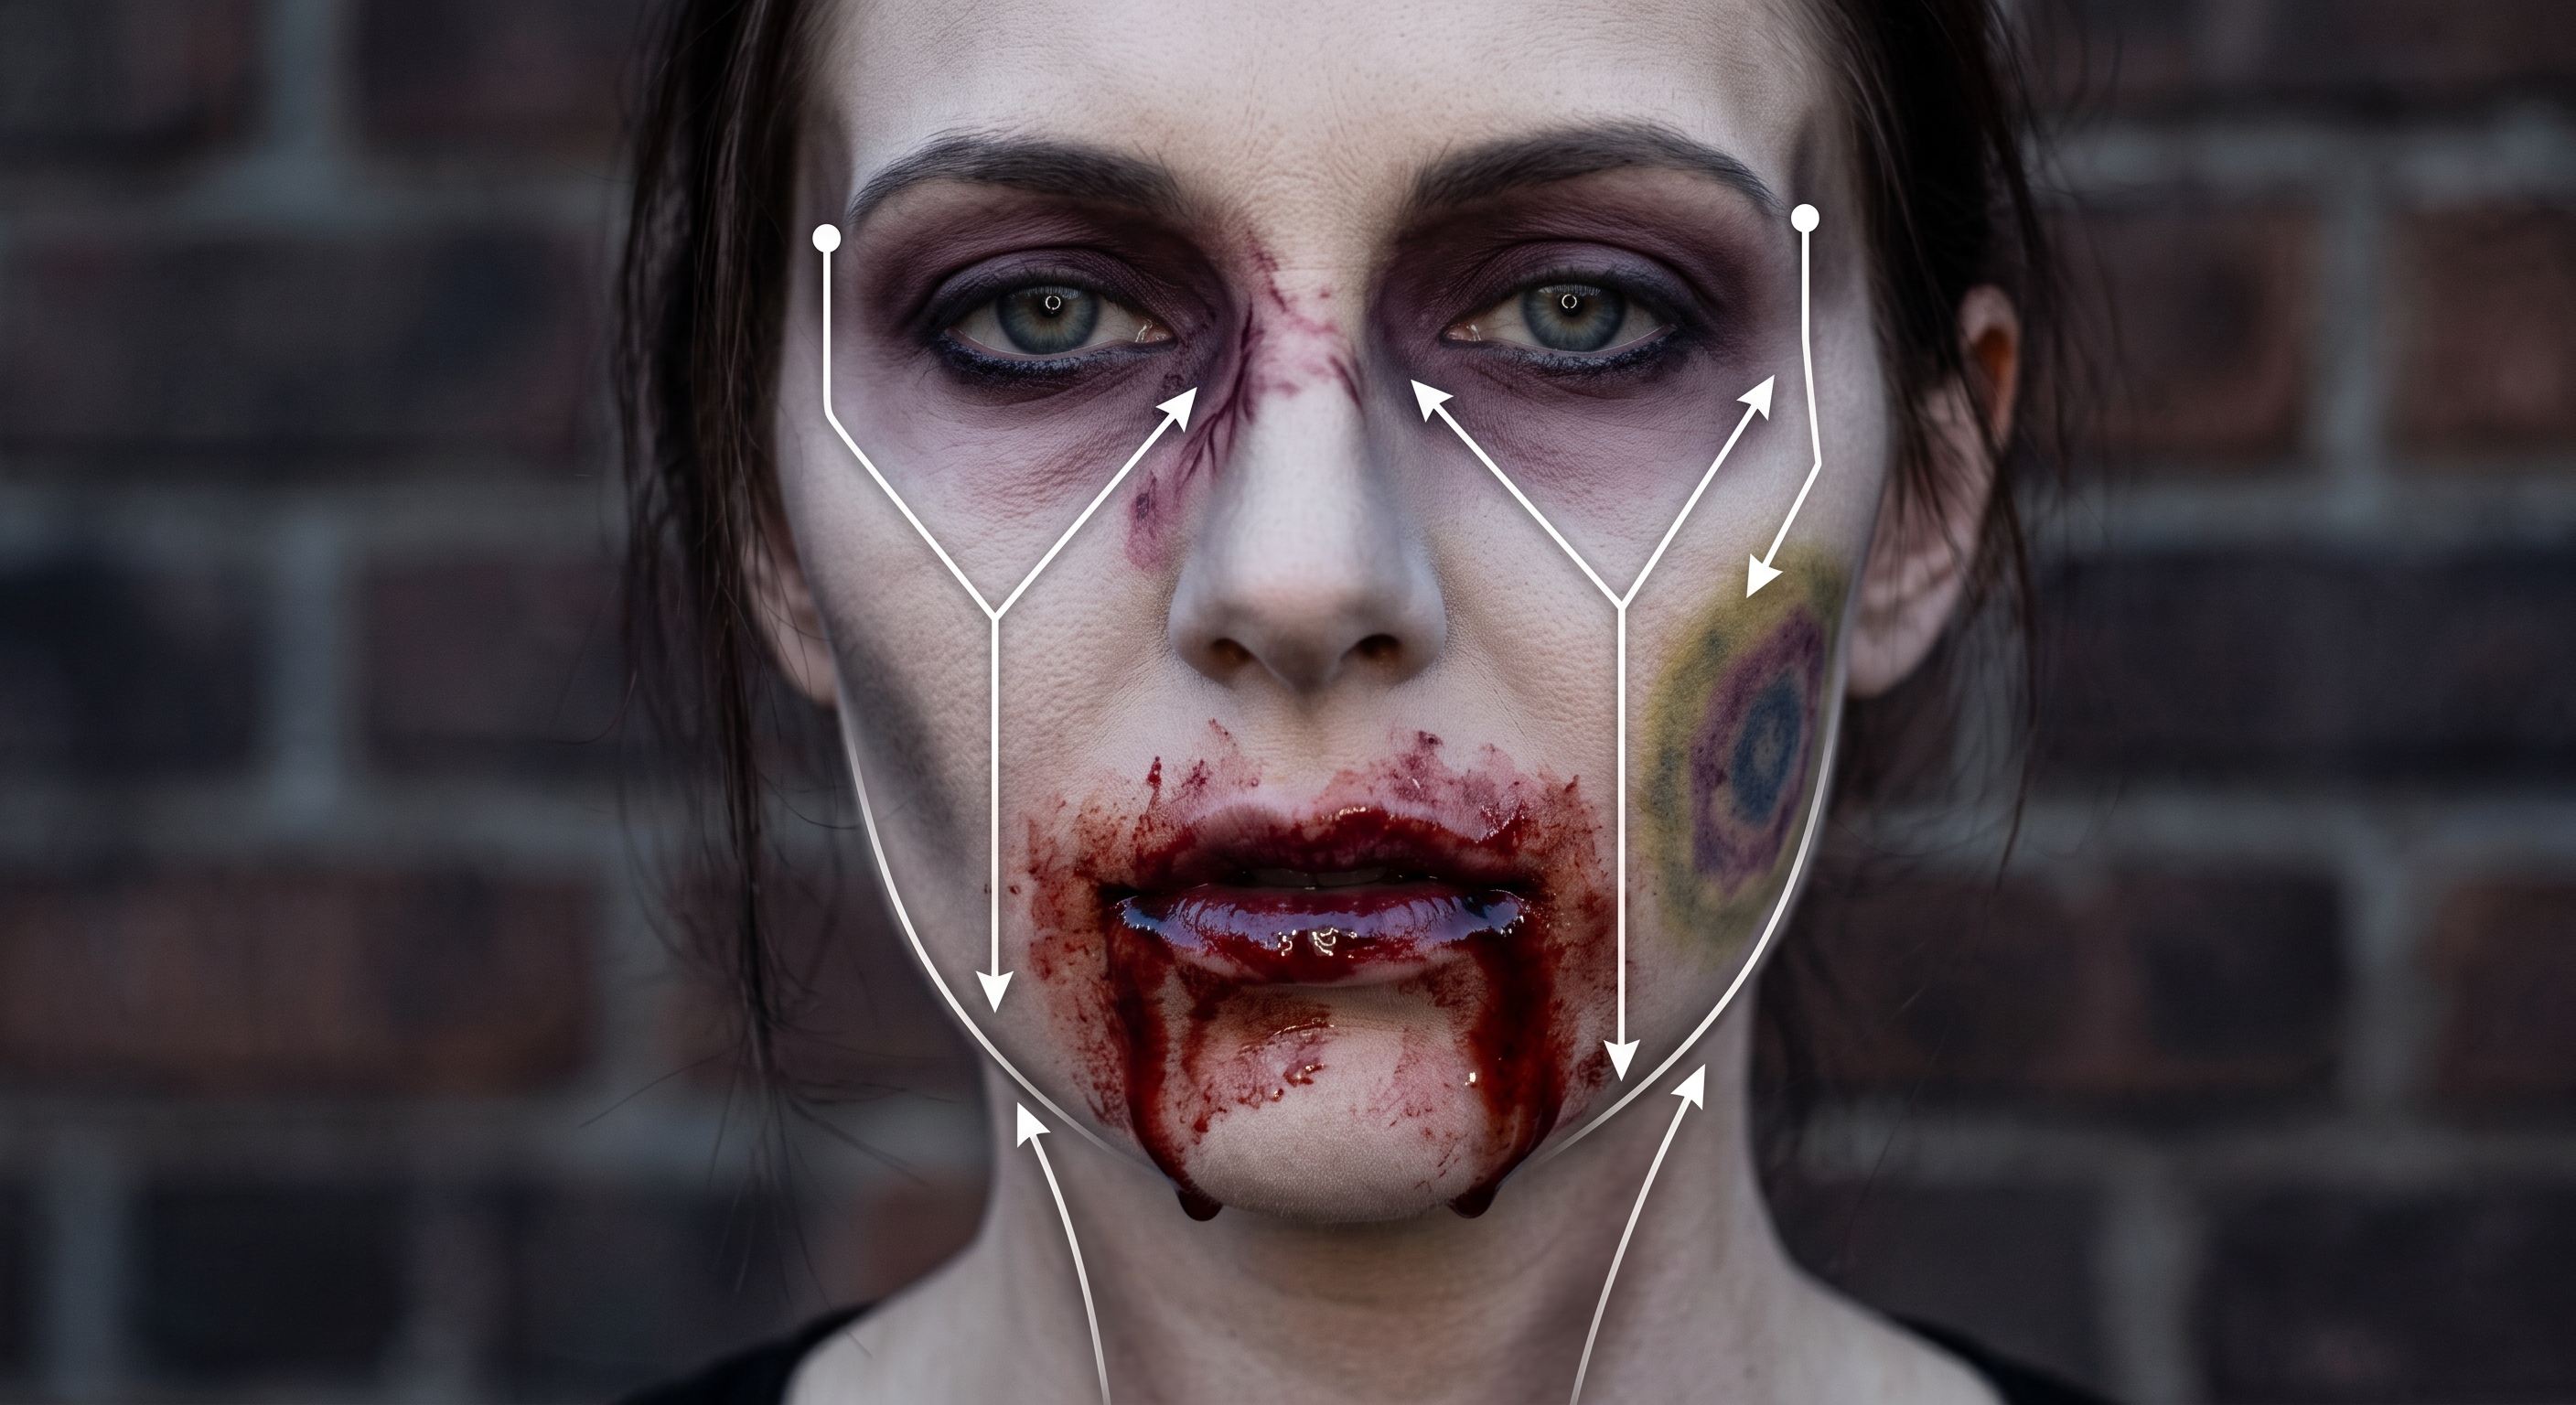
Zombies look dead because their tissue has lost hydration and volume, causing the skin to cling tightly to the underlying skull. Instead of randomly slapping grey powder onto your face, follow your natural anatomical structure to carve out dramatic hollows.
The Eyes
-
The Sockets: Take a fluffy blending brush with a mix of cool grey and dusty purple eyeshadow. Pack the shade into the inner corners of the eyes, moving up toward the bridge of the nose.
-
The Undereye: Drag the purple and brown shades under the lower lash line, bringing the color down further than you normally would. Focus the darkest intensity right along the tear duct and orbital bone to simulate blood pooling beneath the skin.
-
The Lids: Keep the center of the eyelid slightly lighter, but blend deep plum into the crease and outward toward the temples to elongate the eye shape into an editorial, feline sweep.
The Cheekbones and Jaw
-
Cheek Cavities: Locate your cheekbones. Place a dense contour brush directly beneath the bone and sweep a cool grey-brown shade downward toward the corners of the mouth. Stop about an inch away from the lips. Blend the top edge upward so the contour looks like a natural shadow cast by prominent bone.
-
Temples: Dust grey eyeshadow into your temples, blending into the hairline to give the illusion of a narrower, more skeletal forehead.
-
Jawline and Neck: Shadow the underside of your jaw. If you want to accentuate your neck tendons, tilt your head back, tense your neck, and apply grey-brown shadow along the sides of the raised muscle cords.
Step 3: Layered Vascularity, Bruising, and Veining
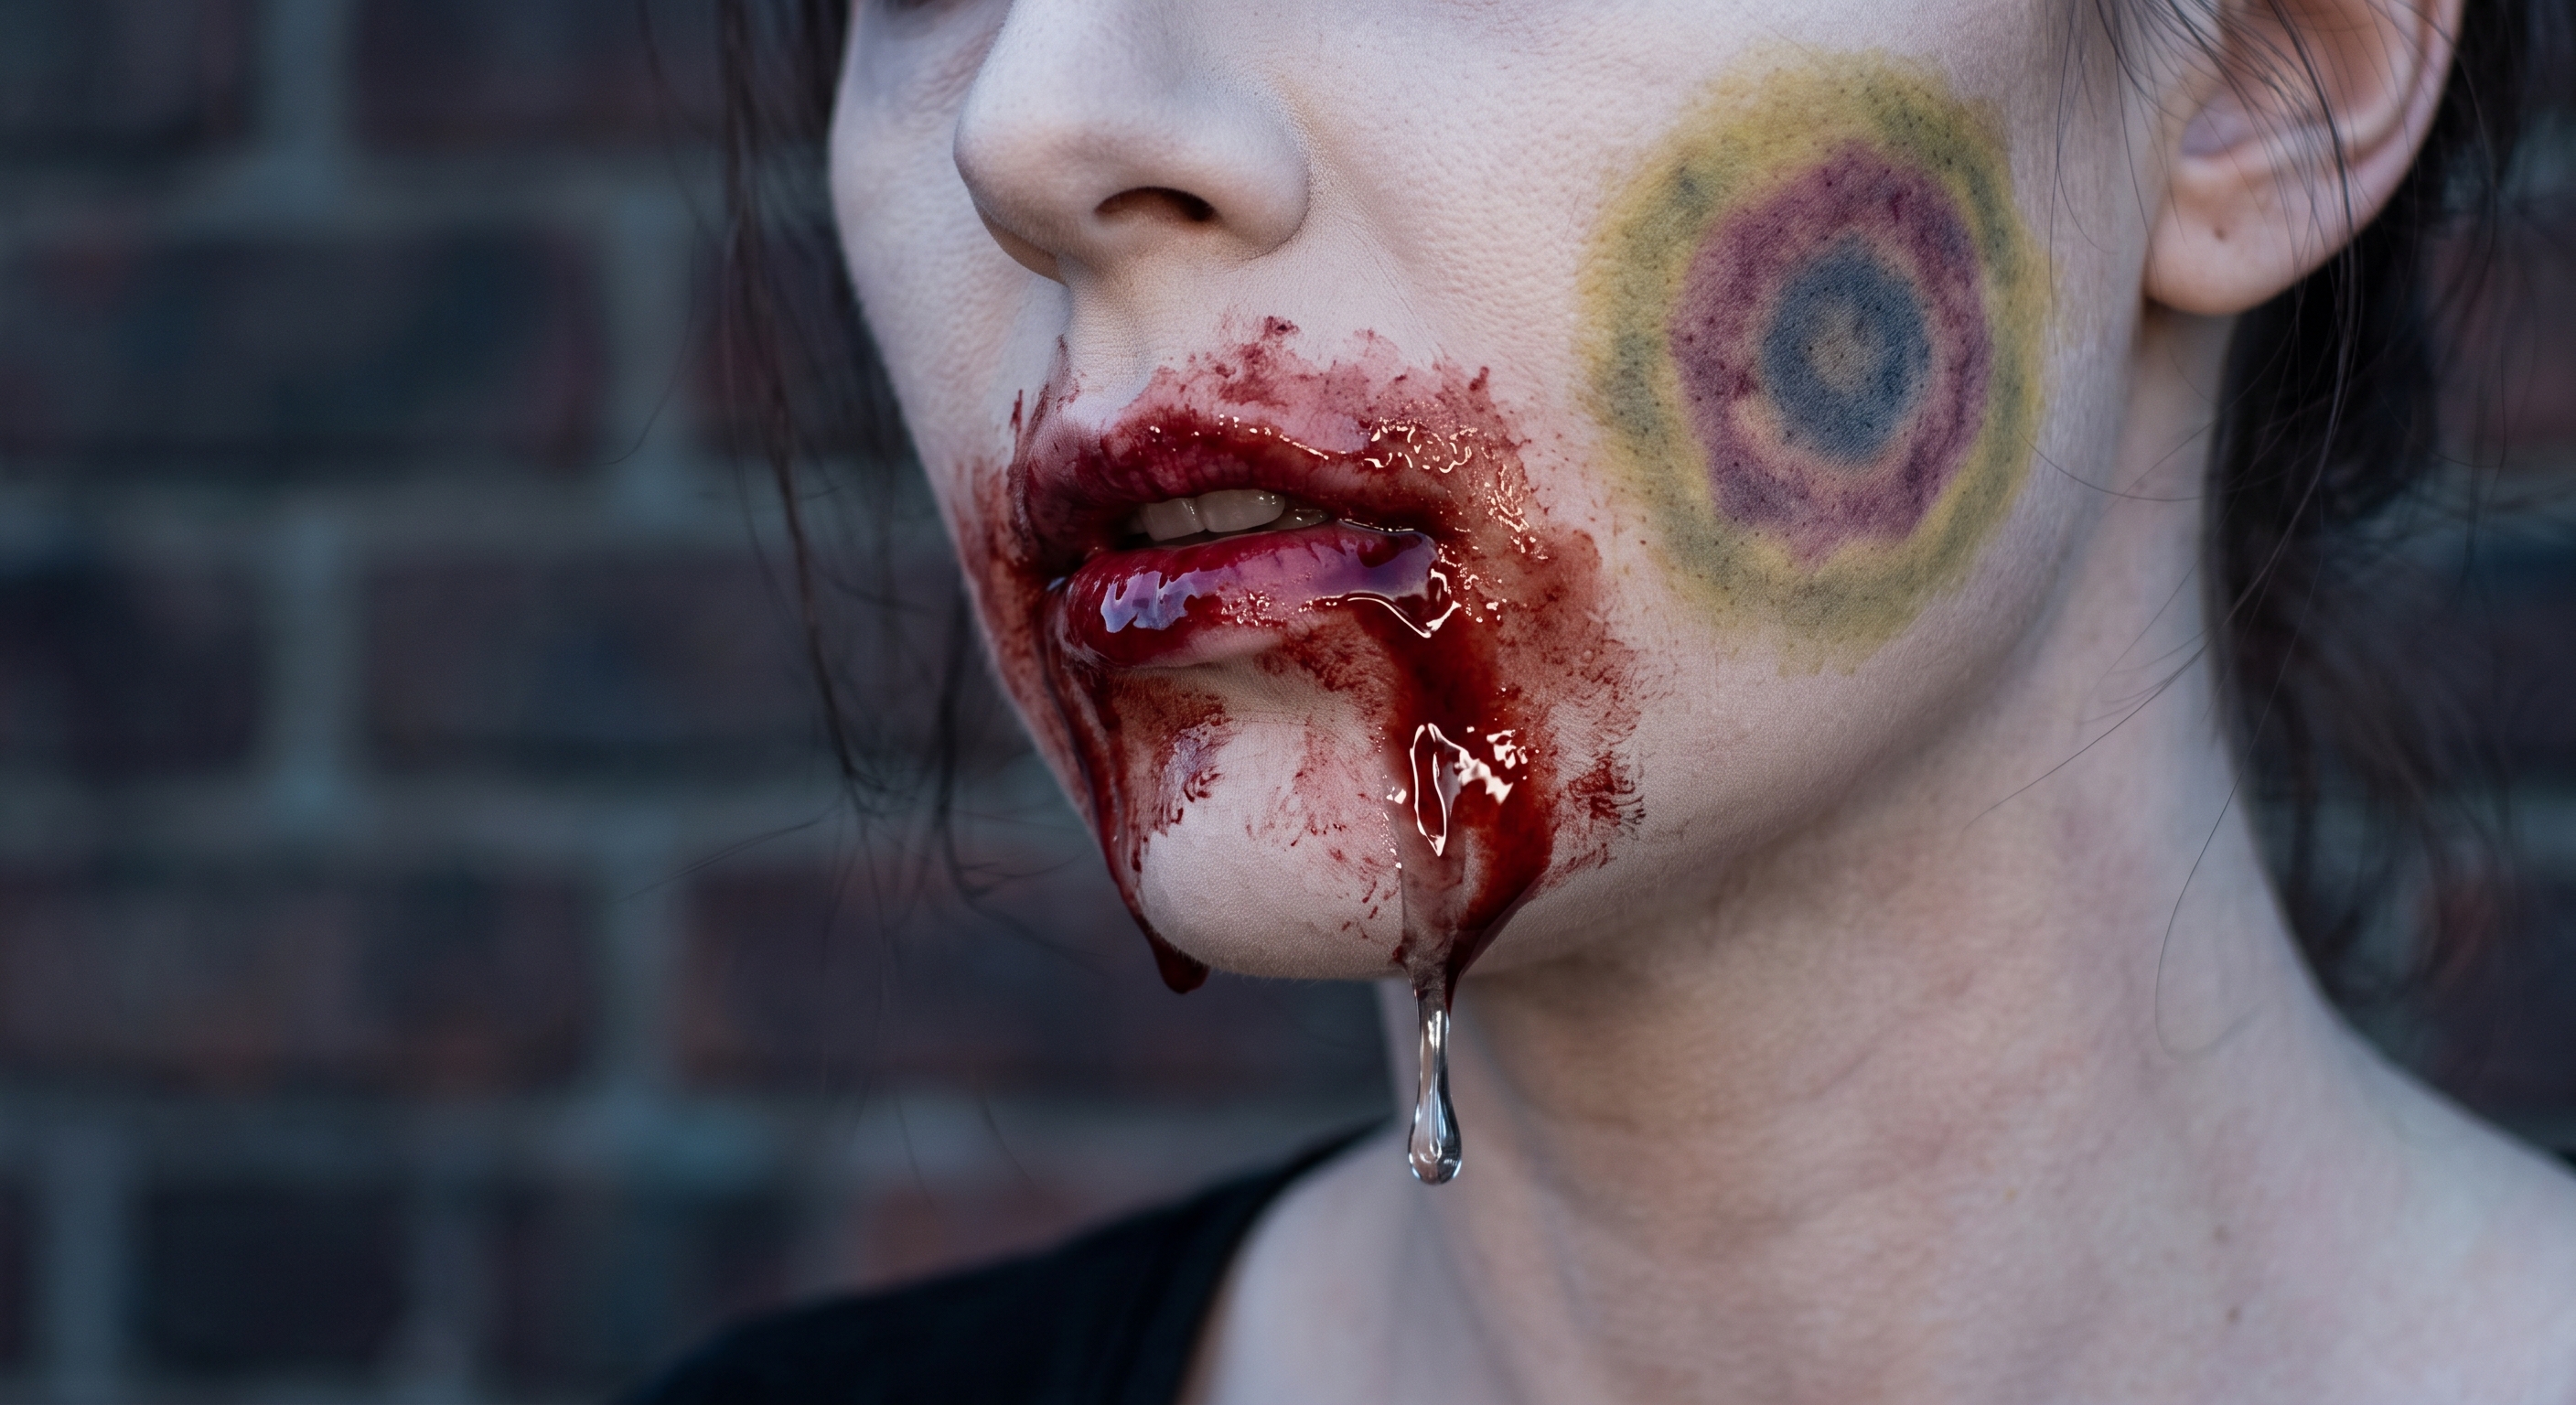
Real skin discoloration is never a single flat color. Bruising and broken capillaries occur in layers underneath the skin surface.
Building Realistic Bruises
-
First Layer (Yellow/Green): Use a fluffy brush to stipple a tiny amount of dull olive green or mustard yellow eyeshadow onto areas prone to impact or vascular settling (around the eyes, collarbones, and temples). This represents old, breaking-down blood tissue.
-
Second Layer (Plum/Burgundy): Layer dusty purple and oxblood shadow inside the green/yellow outline. Concentrate the red and plum shades toward the center of the area to mimic fresh tissue damage.
-
Third Layer (Grey/Blue): Add a subtle touch of dark blue or charcoal grey right in the core of the bruise to give it depth.
-
Take a fine-detail liner brush and damp it with setting spray, or use a fine-tip gel eyeliner in dark burgundy or muted slate blue.
-
Draw delicate, branching vein patterns extending outward from the inner corner of the eyes, down the neck, or along the collarbones.
-
The Secret Realism Trick: Gently press a warm fingertip or a lightly damp beauty sponge coated in translucent powder directly over the drawn veins. This slightly diffuses the sharp edges, making the veins look like they sit underneath pale, translucent skin rather than drawn on top.
-
Step 4: Textured Skin and Peeling Details
Instead of heavy latex appliances that restrict facial movement and feel uncomfortable, create delicate, strategically placed skin textures.
The Washable Glue-Stick Method
-
Application: Rub a small amount of non-toxic, washable Elmer’s glue stick onto a metal palette or the back of your hand. Pickup a small amount with your finger and dab a thin layer onto a targeted area, such as the edge of the jaw, cheek, or bridge of the nose.
-
Drying: Let the glue dry for about 60 to 90 seconds until it becomes tacky and translucent.
-
Creating the Peel: Take a plastic toothpick or a clean cotton swab and gently roll or tear the center of the dried glue patch outward. This creates a fine rim of “peeled skin.”
-
Coloring the Wound:
-
Apply deep burgundy or black gel liner into the center exposed area where the glue was pulled back.
-
Dust dark red eyeshadow inside the tear to mimic raw, exposed dermis.
-
Apply pale concealer onto the lifted outer lip of the glue to match your pale skin tone.
-
Step 5: Glossy Blood Application & Editorial Accents
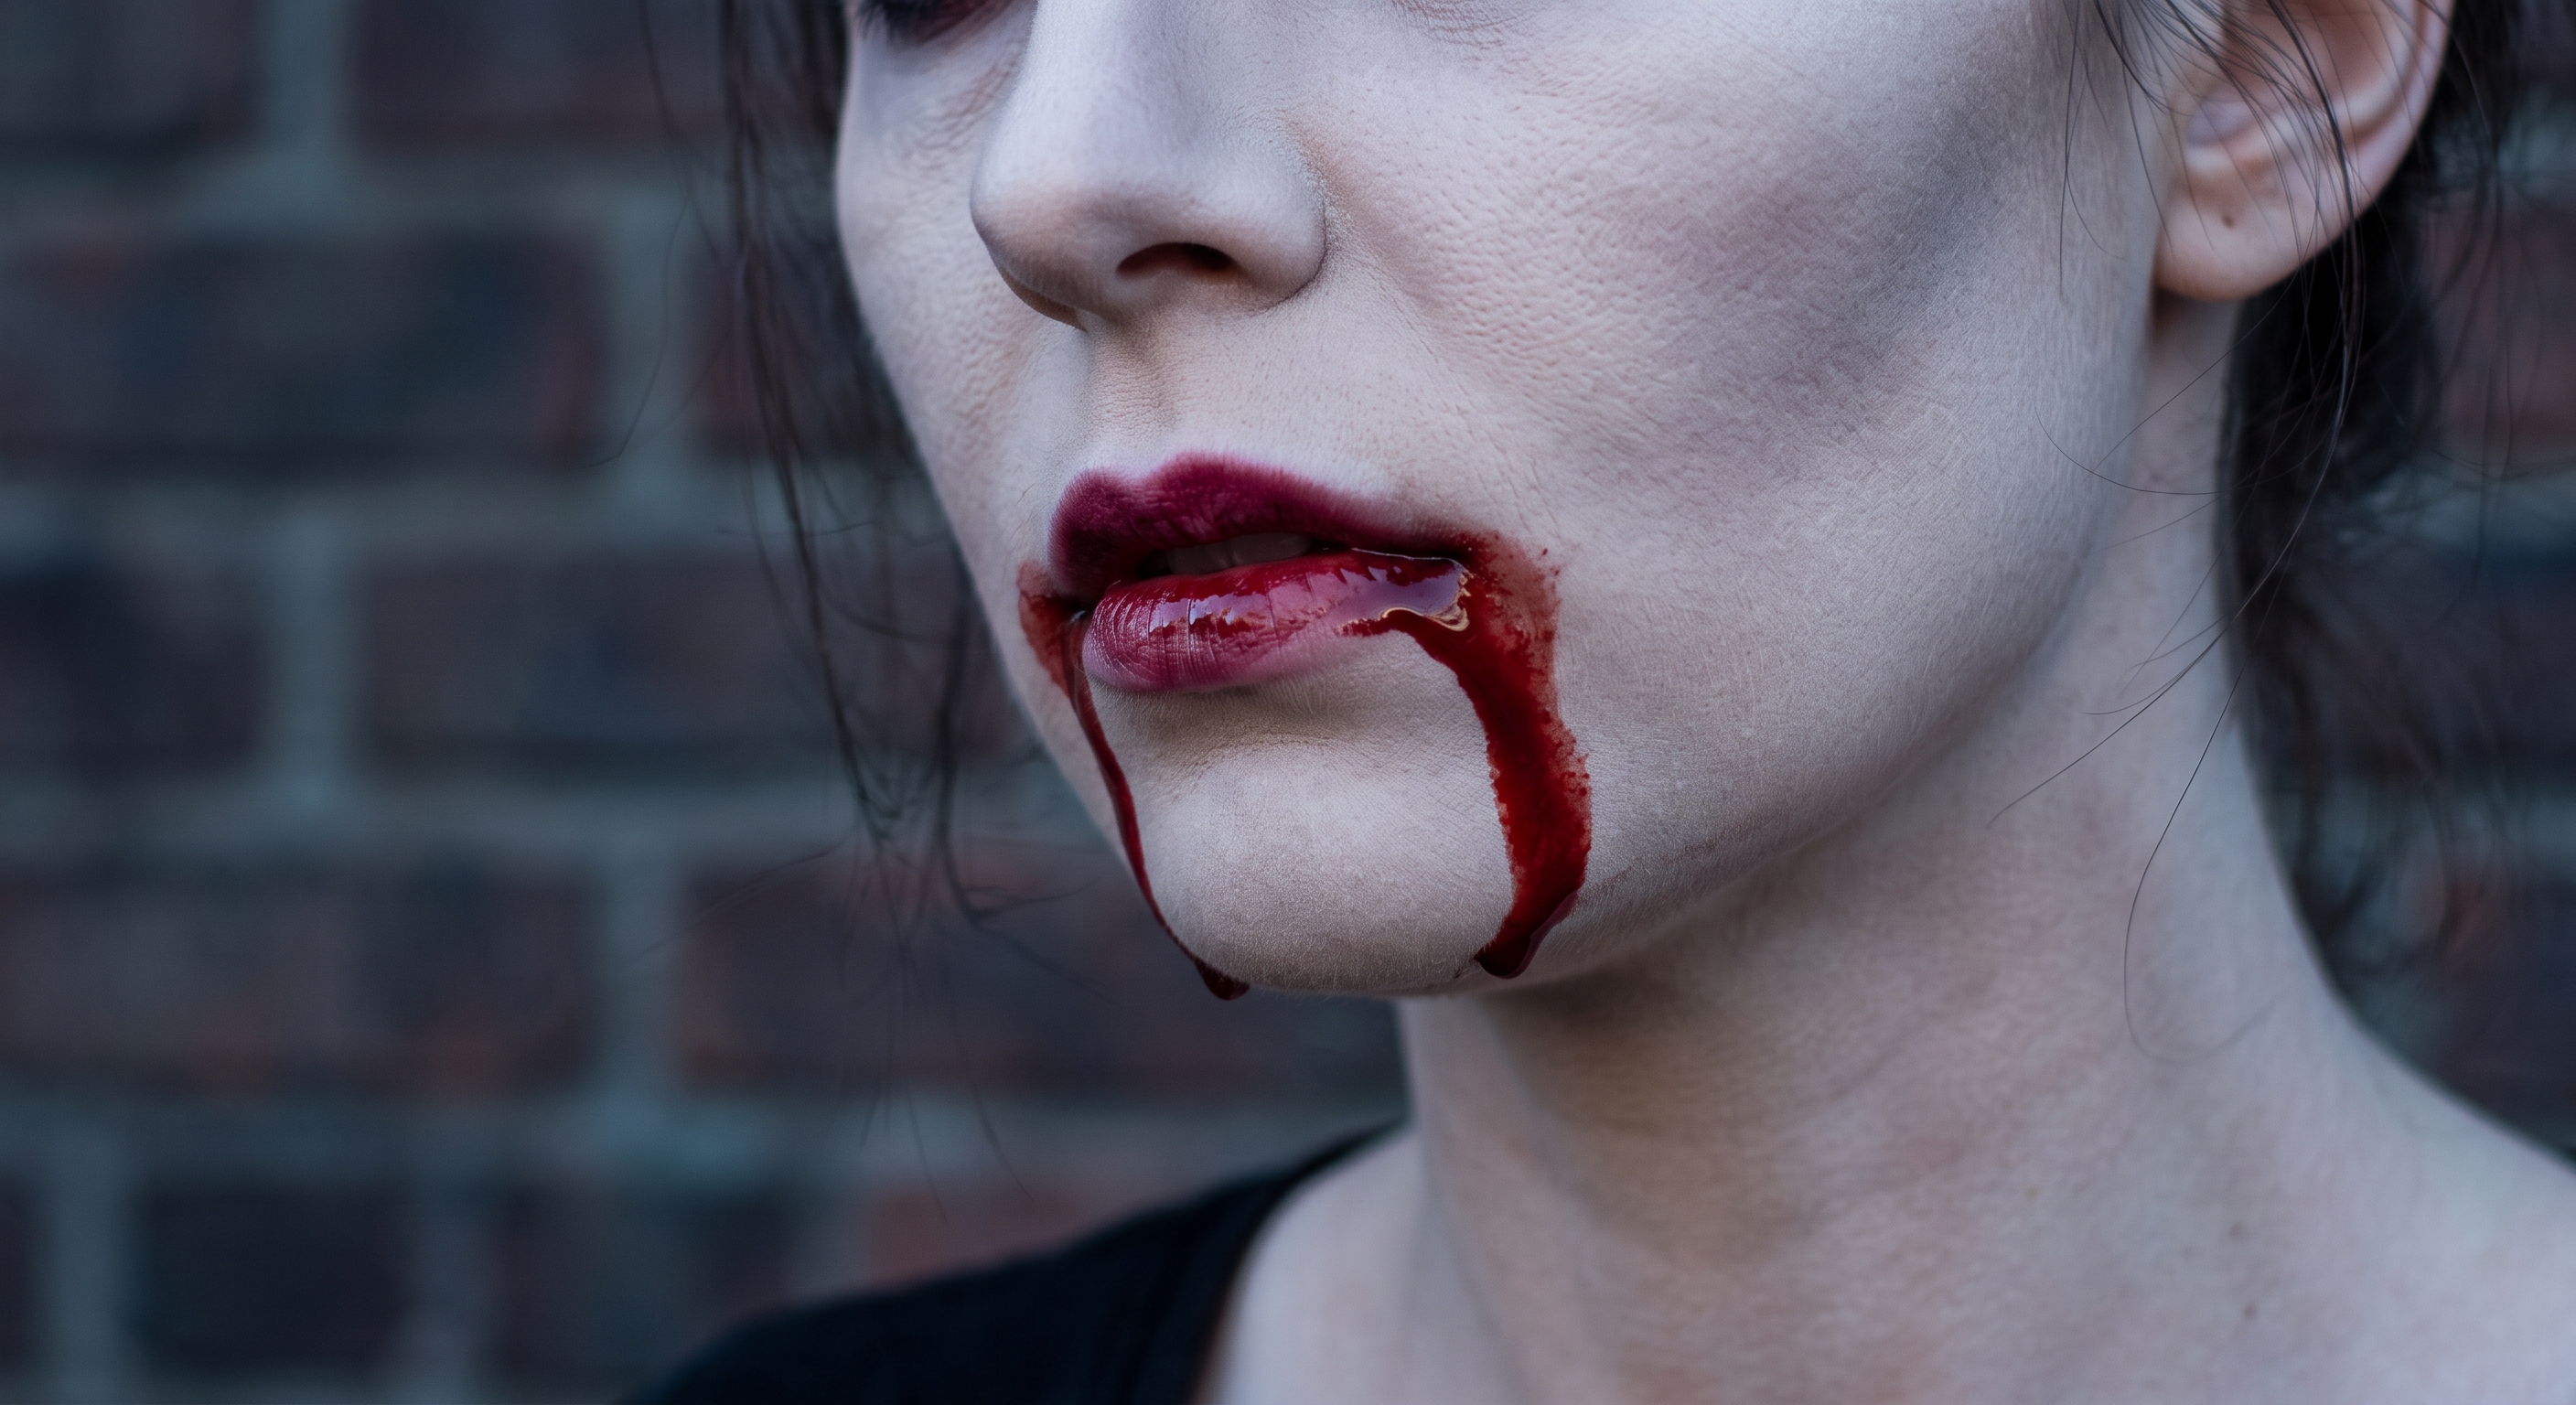
Standard fake blood dries into a matte, crusty scab that looks flat under bright lighting or mobile camera flashes. Using a high-shine gloss technique keeps the blood looking fresh, dynamic, and fluid throughout the night.
The Wet-Look Blood Formula
-
Mixing: On a stainless steel makeup mixing tray, combine three parts thick gel fake blood with one part clear, high-shine lip gloss or liquid glycerin.
-
Placement:
-
The Mouth: Apply deep red lipstick or lip stain messy onto the center of your lips. Take your wet-look blood mixture on a small brush and let a tear-shaped drop hang from the corner of your lower lip, dragging it gently down toward your jawline.
-
The Eyes: Place a single precise dot of gloss blood near the inner tear duct to give a subtle, infected appearance without irritating your eye.
-
Wounds: Fill the center of your glue-stick peels with the high-gloss mixture using a fine brush so the center catches ambient light.
Step 6: Hair, Wardrobe, and Finishing Touches
Makeup is only half of the transformation. To complete the modern aesthetic, your overall styling needs to match the grungy, effortless energy of the face application.
Hair Styling
-
Texture & Separation: Spray dry shampoo or texturizing salt spray liberally through your hair. Work a small amount of matte pomade or hair wax through the mid-lengths and ends to create piecey, separated strands that hang loosely around the face.
-
Wet Accents: Apply a small amount of hair oil or clear gel right around the hairline and temples to look like damp, bedraggled perspiration.
Wardrobe & Accessories
-
Color Palette: Stick to monochrome, washed-out tones—charcoal, washed black, olive drab, cream, and muted stone.
-
Distressing Technique: Take a piece of coarse sandpaper or a cheese grater to the edges of an old oversized t-shirt, sweater, or denim jacket. Fray the neckline, hem, and cuffs for a worn, lived-in feel.
-
Colored Lenses (Optional): Milky white, blind-effect, or deep red contact lenses instantly elevate the transformation into a cinematic-quality look. Always ensure you purchase lenses from reputable optical vendors to protect your eyes.
Pro Photography & Longevity Tips
When you’re spending time perfecting fine detail work, you want to make sure it stays intact and renders crisp on camera.
Flash Photography Testing
Translucent setting powders containing high amounts of silica can cause severe “flashback”—a white, chalky cast that appears in flash photography.
-
Always test your makeup by taking a photo with your smartphone flash on in a dark room before leaving the house.
-
If you see white powdery spots under your eyes or on your forehead, brush them away with a clean powder brush dipped in a tinted setting powder that matches your base tone.
Setting Your SFX Makeup
Traditional alcohol-based setting sprays can break down grease and wax products. Instead, use an oil-control, film-forming setting spray.
-
Hold the bottle 8 to 10 inches away from your face.
-
Mist in an “X” and “T” motion over the entire face.
-
Avoid spraying high-gloss blood areas directly, as heavy water drops can thin out the gloss finish.
Safe Removal Strategy
Removing multi-layered makeup, blood stains, and glue doesn’t have to ruin your skin barrier:
-
Oil Cleanser or Cleansing Balm: Apply a generous layer of cleansing balm or micellar oil directly onto dry skin. Massage gently in circular motions to break down glue, fake blood, and waterproof eye products.
-
Warm Towel: Wipe away the dissolved product with a warm, damp microfiber cloth.
-
Gentle Water-Based Cleanser: Follow up with your standard hydrating facial cleanser to remove any remaining oil residue, leaving your skin fresh, clean, and balanced.
-
-
-

This is an original creative work by Salty Vixen. This story/article, including its characters, plot, and descriptive content, is protected by copyright law. Unauthorized copying, sharing, reposting, or reproduction in any format is strictly prohibited. This content may not be used for AI training, data scraping, machine learning, or any form of artificial intelligence development without explicit written permission from © 2026 Salty Vixen Stories, Inc. — All rights reserved.. Violators will be pursued to the fullest extent of the law.
