Reupholstering the seat of a dining style chair is one of the easiest ways to make a big change with little effort. This sturdy, comfortable ladder-back is perfect for the worktable in my library. The lines are simple, but the arms have an unexpected curve. Though the finish is nearly perfect, the seat fabric is boring and filthy.
The room doesn't get much natural light, so something bright is best. A geometric pattern would work well with the lines of the chair, but a pattern with some curves will make it more interesting. My final choice is a linen-look cotton with a bright botanical print.
Remove the Seat

Turn the chair upside down, and unscrew the seat from the frame. Once you’ve removed the seat, make your repairs to the wood part of the chair -- painting, refinishing, or tightening joints. Make sure everything is dry, not sticky to the touch, before you reattach the seat.
Note: If you encounter a tack strip, a long strip of cardboard with tacks that hold the seat to the frame, instead of screws, just pry the seat off with a flathead screwdriver.
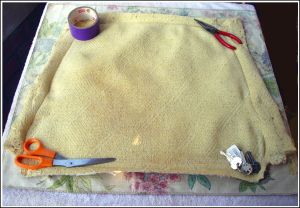
Turn the seat over. Use a staple remover to remove the old fabric. If the staples are stubborn, pull them out with needle-nose pliers. Save the old seat fabric. You'll need to use it as a pattern.
Remove the Old Fabric

Note: If the padding is in bad shape, or you just want a softer seat, add a new layer of batting. It's sold in most fabric and hobby stores. Add it to your seat by using the steps on pages 5- 7, but with a sheet of batting instead of your new fabric.
Center Your Pattern

If your new seat fabric has a pattern, turn the seat right-side up and place the new fabric on top. Pressing around the perimeter of the seat, center your pattern. Mark the corners with straight pins.
You can skip this step if your fabric doesn't have a pattern.
Cut Your New Seat Cover

Turn your new fabric right-side down, and put the old seat cover on top as a pattern.
Note the locations of your pins and adjust if needed, feeling underneath. Line up the corner creases of the old seat cover with your straight pins.
Weight down the old cover at the corners, and trace around the old seat cover with a pencil or chalk. Smooth out the edges with your hands as you trace it, so your new cover doesn't end up too small. You can pin the old seat cover to your new fabric before tracing if you don't feel confident about smoothing it as you go.
Remove the old seat cushion, and then cut out your new one, using the pencil or chalk lines as your guide.
To prevent fraying, use your sewing machine to zigzag or serge around the edges of your fabric. If you don't want to sew, fold tape along the edges.
Press your fabric if it's wrinkled or creased.
Note: In this case, there is no need cut the new fabric. Since the fabric was originally a furniture store fabric sample, it isn't much larger than the old seat cover, and the edges are already serged to prevent fraying. Since the cotton is lightweight, the extra fabric on the edges won't bunch, or be too thick to staple.
Attach Your Fabric to the Seat

Turn your new seat cover right-side down. Place the seat cushion, also right-side down, on top of it.
If you have pins to mark the corners of a patterned fabric, make sure they are aligned with the corners of the seat cushion.
Starting with the top edge, staple once in the center.
Repeat with the bottom edge, pulling the fabric tight before you staple.
Repeat with each side, and keep pulling the fabric tight before you staple.
Working one side at a time, staple from the center outward, until that side is completely stapled. As you staple, keep pulling the fabric tight, and smooth the fabric underneath from the center. Leave the corners unstapled.
Repeat on all sides until everything is stapled but the corners.
Keep the Corners Neat

Grasp one corner of your cover and pull the point toward the center of the seat cushion. Staple.
Arrange the remaining unstapled corner fabric into small even pleats, pulling tightly. Staple.
Make sure you don't staple over the screw holes.
Repeat steps 1- 3 for the three remaining corners.
This step is optional: Attach the Welt
Welt is often called piping or cording. Using it will give the seat a professional, finished look, and, in this case, adds a nice pop of color. You can buy decorative cording in fabric or upholstery shops, or make your own.
To apply the welt, arrange it along the edge of the seat and staple the lip, the flat edge. When you turn the seat over, only the rounded edge with the cord inside should show.
Reattach the Seat and Enjoy

Place the seat on the chair frame. Line up the screw holes of the seat and chair frame.
Get the screws started, so the seat doesn't fall off once you turn the chair upside down.
Turn the chair over and tighten the screws until the seat is firmly attached. Be careful not to tighten too much; you don't want to strip the holes.
Admire your new chair.
In this case, the simple cotton compliments the oak. The birds in the pattern make it feel earthy rather than prissy, though it’s still a nice contrast to the rather masculine look of the chair. Piping the seat in berry-red boucle grounds the light background of the seat fabric, and adds a nice pop of color.


